
At the shores of the Great Salt Lake, near Saltair
Salt Lake City, UT
Nikon D200, 1/250s @ f/2.8, ISO 200
Sigma 30mm f/1.4
Today's installment of "How I Lit It" comes to you via fellow Utah photographer Rich Legg, who passed this technique on to a group of photographers at a Photowalking Utah event last summer on the shores (and in the waters) of the Great Salt Lake.
The image above was shot at sunset and the camera's white balance was intentionally set to Incandescent or about 3000K, which changes the apparent color balance to a much cooler, bluer lighting temperature that gives the overall scene a rich blue color cast. Meanwhile, Rich pointed a 4 million candlepower tungsten spotlight at model Heidi Mason's face to not only to properly illuminate her face but also to cast a color-correct incandescent beam upon her.
As a comparison, here's the same photo as above with the white balance set as one might normally for the scene, to 7200K or Shade.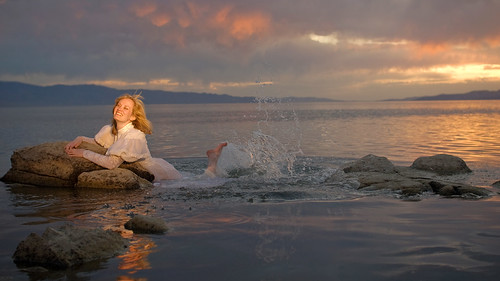
About this technique, Rich wrote in his blog: The combination of the blue background and the normally toned bride were achieved completely in camera by lighting the model with several handheld tungsten lights and adjusting the white balance to the corresponding temperature. The naturally lit background then became the wonderful blue tone displayed in the image.
As the spotlight's power was fixed shooting this was a fairly simple affair of just asking Rich to turn on the light and spot meter on Heidi's face. It's a technique that's fairly straightforward technically and is one that's sure to garner you some attention - just be sure not to abuse it as it could get old quick. :)
Here's the setup as seen from above, thanks to www.sdgphoto.com/lightingstudio: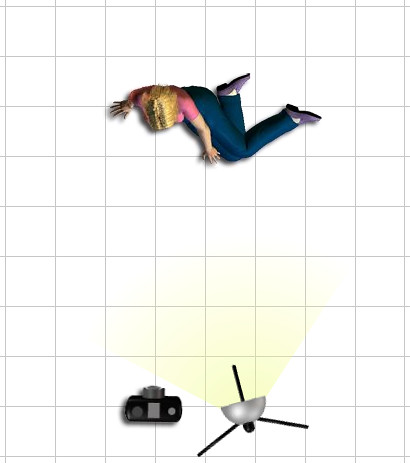
Thankfully some of the other photographers at this event thought to take some photos of Rich, Heidi and me at work, here's a behind-the-scenes from Ryan [Dr Claw's keeper] - thanks!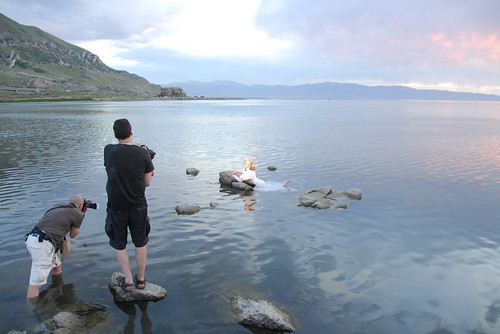
And here's another angle from Jeremy [JeremyHall].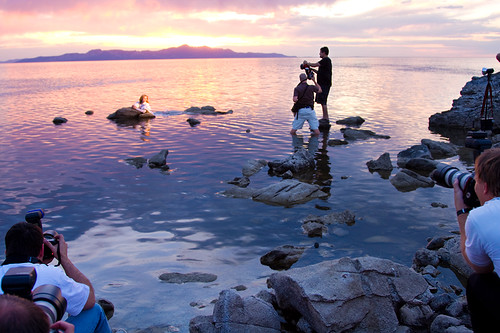
Finally, to give you an idea of what the scene looked like with the white balance set to daylight, here's another pose I took just prior to my blue photo above: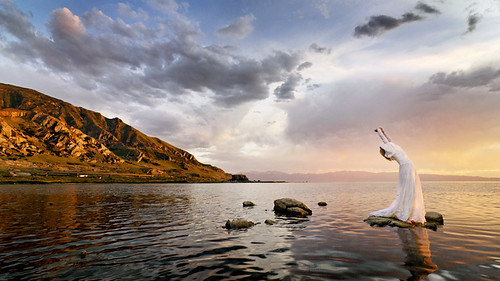
Tuesday, February 24, 2009
How I Lit It: Heidi at The Great Salt Lake
Subscribe to:
Post Comments (Atom)


8 comments:
I'm really sad I missed that event (tried but was lost wandering the salt flats alone). Nice little article!
I love the blue background photo - but even the "normal" one is gorgeous.
That is my kind of photowalk... I can't wait for some more outdoorsy photowalks.
Great Stuff!
Amen, great stuff for posting the how to's on this. So here is my next question for you. :)
1) I bought the monster Nikon SB-900 AF light, which as I understand can be fired remotely from the D90
? What light stand/umbrella cheap/entry level can I get to go with this?
These are simply amazing. The lighting looks like it comes straight out of a movie. Thanks for posting these tips for us.
Thanks so much for the comments and questions. To answer Mark's question on his new Nikon SB-900 Speedlight (congrats!), I realise the temptation is there to start off with some cheap lighting gear, especially after spending so much on a new light but you must resist!
My first setup was a flimsy cheap stand, a mostly plastic umbrella adapter and a small, flimsy white shoot through umbrella. Sure I saved a few bucks but less than 2 years later the knob that secures the stand's legs won't tighten, the knob that locks down the umbrella shaft has broken off and the umbrella itself is tearing at the seams.
To add to that, the cheap stand is much too light and is prone to being knocked over at the slightest nudge.
What a waste of money.
I have since added to my kit a proper - and yet not overly expensive - setup for my Speedlight, which has served me very well. Here's what I use:
Stand: Giottos 8' Air Cushioned Lightstand with Reversible 1/4" and 3/8" Mounting Stud, $43
The stand is much more durable and beefy (and heavier, which is fine by me) and has an air-cushioned shaft, which softens the fall of the extension tube once you release the tension.
Clamp: Bogen 2905 Swivel Umbrella Adapter, $30
This clamp has since been replaced by this model but the 2905 is cheaper and I don't really see the difference between the two.
The clamp is all-metal and my only complaint about it is that the hole for the umbrella is far enough away from the top that when used with Speedlights the head of the lights fires to far away from the center of the umbrella. I don't think this is as much of a problem with studio lights and is a function of how tall the Speedlights are, which places the bulb so far away from center. I've read that there are other models of umbrella adapters that place the hole closer to the top, like this one but I haven't used any of them yet.
Umbrella: Westcott 45" Optical White Satin Umbrella with Removable Black Cover, $29
I love this brolly, it's big, tough and flexible since you can use it either as a shoot-through or a bounce (with its removable black cover mounted). It's also a very neutral fabric and doesn't cause any color cast problems.
Total cost is around $100, not cheap but the durability is definitely worth the extra money.
Anyone else have thoughts or questions?
Another photographer, Zig P asked me offline about how much I had invested in my lighting setup minus the Speedlights.
In addition to the equipment above, here's the info on the cheaper lighting setup I referred to: Photography Studio Continuous Lighting Umbrella Kit for $33, which included the stand, umbrella and the umbrella adapter - however the light source is a continuous compact florescent hence it doesn't have a hotshoe adapter so I had to spend about $15-$20 for a cheap plastic umbrella bracket.
All said I spent about $150 or so in the non-speedlight portion of my setup. I also spend smaller amounts of change on sheets of lighting gels (about $5 for 2'x2' sheets locally), a roll of Velcro to use to stick the gels to my Speedlights and maybe $10-$15 on a Sto-Fen diffuser dome for my SB-600 (the SB-800 comes with one).
Hmm, the original Westcott 45" Optical White Satin Umbrella with Removable Black Cover link is bad (thanks, Zig) but this should work.
Ok so tonight for the very first time in my life I slaved my SB900 to the D90 :) I still haven't the foggiest what I am doing but it was fun. I've got a million miles to go with this lighting stuff, landscapes are so much easier!
I also bought the three recommendations, I won't know what to do with it when I get it either but I'll be able to start learning and this year at the Santa Claus setup at the church Christmas Party I'll be ready!
Thanks for the help guys.
cheers
mbg
Post a Comment