Showing posts with label HowILitIt. Show all posts

Tuesday, May 19, 2009

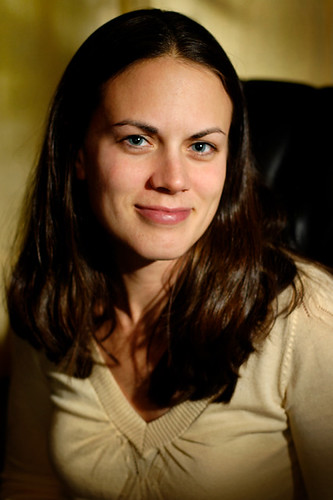
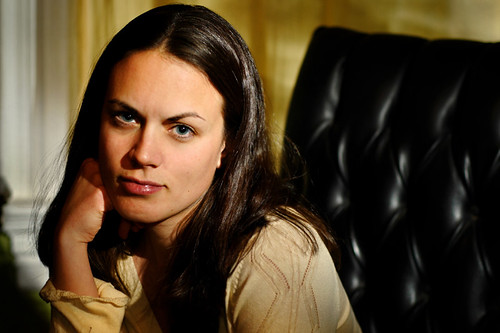
How I Lit It: vSpring Capital's Dr. Dinesh Patel

Dinesh Patel

Dr. Dinesh Patel
Managing Director, vSpring Capital
Winner of the 2009 Utah Genius Award

Salt Lake City, UT
Nikon D700
Nikkor 35mm f/2


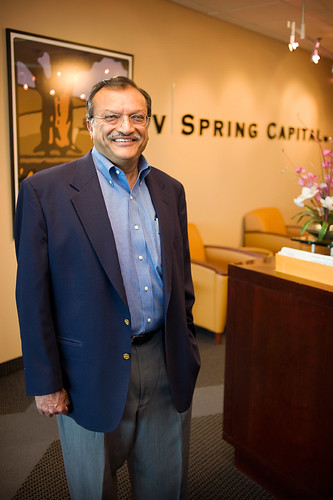
This is an outtake from an assignment for Utah CEO Magazine but I thought it would make for a good example for my "How I Lit It" series.

These executive portraits are normally short on time as the executives have understandably busy schedules. The last few executives I've photographed had only about 15-20 minutes available for shooting and I've learned both from experience and from pros like David X. Tejada that arriving early (up to an hour if possible) to scout, set up lights and test is highly beneficial. In this case I had about 30-34 mins to find two locations and test lighting them using a mix of available light and my three Nikon Speedlights.

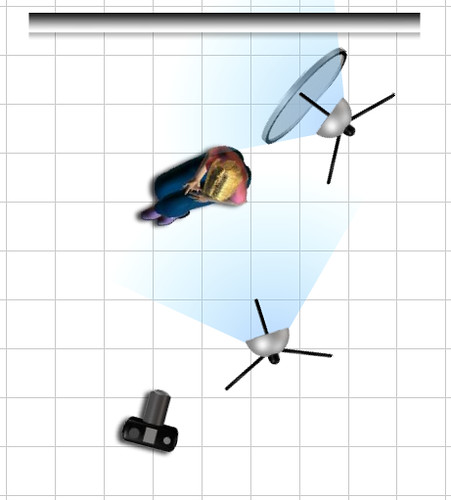
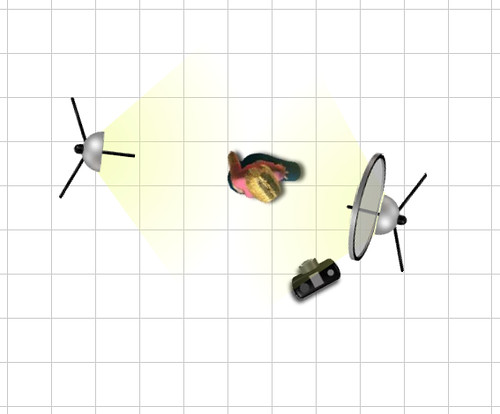
In the above outtake I used a stand-mounted Nikon SB-800 as my key light, which was immediately camera right, shooting through a 43" white shoot-through umbrella and was gelled 1/2 CTO to warm it up a touch to match the ambient color temperature (a mix of diffuse daylight and artificial lights). For a hairlight/rimlight I used a stand-mounted Nikon SB-600 that was positioned camera left and behind Dr. Patel, shooting through a homemade 2" gridded snoot and also gelled 1/2 CTO. Both Speedlights were fired via the Nikon D700's popup flash using Nikon CLS (Creative Lighting System).

Here's a diagram of the lighting setup:
DineshHowILit

Speedlights are perfect for situations like these. They're light, require no cabling for power or triggering and are quick to setup/takedown - all positives when shooting on-the-go. With Nikon's CLS controlling them it's easy to either dial in manual power adjustments via the camera or just use TTL (through-the-lens) metering to let the camera control all exposures.

Saturday, February 28, 2009

How I Lit It: Manray, the snoot and the cookie


More lighting experimentation, originally uploaded by calanan.

Salt Lake City, UT
Nikon D200
Nikkor 50mm f/1.8D

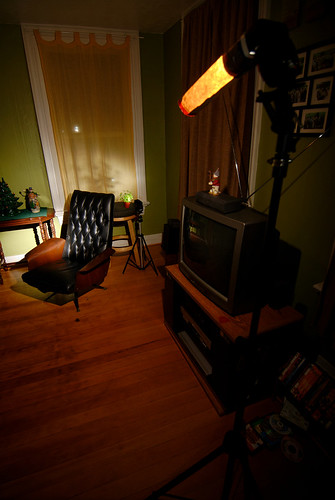
Nikon SB-800 camera right, TTL, homemade snoot
Nikon SB-600 behind model, Manual 1/16 power, cookied through a houseplant

Wait, "cookied through a houseplant?" What the?

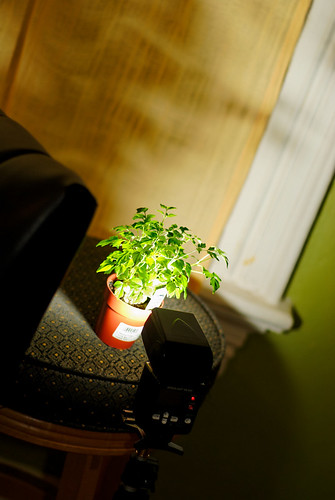
Notice the light and dark pattern behind my wife, Manray? The light from my Nikon SB-600 is being broken up by the leaves of a small houseplant creating a random pattern of light and shadow.

Interested in recreating the look of some old Hollywood portraits taken by photographers like George Hurrell I got the idea to shoot a light through a plant from the Strobist article "Fourth and Long? Drop Back and Punt with a Plant". In the article, David Hobby writes:

"One of my favorite tricks is using a plant as a 'cookie' to add a layer of interest to a photo.

Cookie, in this case, is short for 'kookaloris,' which is genuine photo jargon. It is generally a piece of black cardboard with a pattern of holes in it that you shoot a light through to get a cool pattern on a background."


Also, here's an excerpt from the Wikipedia entry on kookaloris - or cucoloris or however the heck-all you spell it:

"In lighting for film, theatre and still photography, a cuculoris (occasionally also spelled cucoloris, kookaloris or cucalorus) is a device for casting shadows or silhouettes to produce patterned illumination. The word is sometimes shortened to cookie or coo-koo. The cookie is used to create a more natural look by breaking up the light from a man made source. It can be used to simulate movement by passing shadows or light coming through a leafy canopy."


In the photo above I'm also firing a Nikon SB-800 located above and to the left of Manray that has a homemade, cardboard snoot or tube mounted on the Speedlight to narrow the light's beam into a tight circle.

The two-light setup, with the SB-600 and small plant located below, behind and to the left of Manray and the snooted SB-800 on a stand in front of her can be seen below:

The setup

And here's a close-up of the SB-600 and houseplant:

Plant-as-cookie

Here's a lighting diagram of the setup as seen from above, thanks to www.sdgphoto.com/lightingstudio:

ManrayCookie

Sadly, as much as I like the look of a cookied light I just haven't made any more portraits using the technique since Manray and I shot these photos. Thankfully, the process of going through my archives to find lighting examples for "How I Lit It" has reminded me about this technique and has renewed my interest in experimenting with it.

I'll update this post with samples one I've made some some new portraits but for now I'll end this post with another pose of Manray:

More lighting experimentation

Tuesday, February 24, 2009

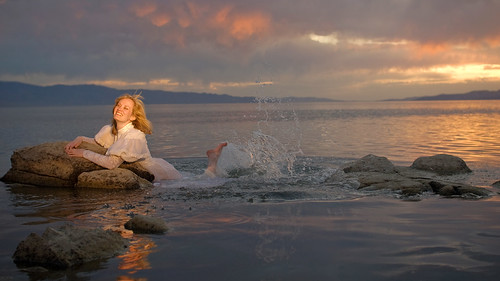
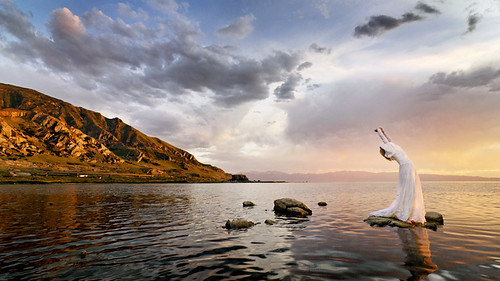
How I Lit It: Heidi at The Great Salt Lake


Heidi at The Great Salt Lake, originally uploaded by calanan.

At the shores of the Great Salt Lake, near Saltair
Salt Lake City, UT

Nikon D200, 1/250s @ f/2.8, ISO 200
Sigma 30mm f/1.4

Today's installment of "How I Lit It" comes to you via fellow Utah photographer Rich Legg, who passed this technique on to a group of photographers at a Photowalking Utah event last summer on the shores (and in the waters) of the Great Salt Lake.

The image above was shot at sunset and the camera's white balance was intentionally set to Incandescent or about 3000K, which changes the apparent color balance to a much cooler, bluer lighting temperature that gives the overall scene a rich blue color cast. Meanwhile, Rich pointed a 4 million candlepower tungsten spotlight at model Heidi Mason's face to not only to properly illuminate her face but also to cast a color-correct incandescent beam upon her.

As a comparison, here's the same photo as above with the white balance set as one might normally for the scene, to 7200K or Shade.

How I Lit It: Heidi at The Great Salt Lake

About this technique, Rich wrote in his blog:

The combination of the blue background and the normally toned bride were achieved completely in camera by lighting the model with several handheld tungsten lights and adjusting the white balance to the corresponding temperature. The naturally lit background then became the wonderful blue tone displayed in the image.


As the spotlight's power was fixed shooting this was a fairly simple affair of just asking Rich to turn on the light and spot meter on Heidi's face. It's a technique that's fairly straightforward technically and is one that's sure to garner you some attention - just be sure not to abuse it as it could get old quick. :)

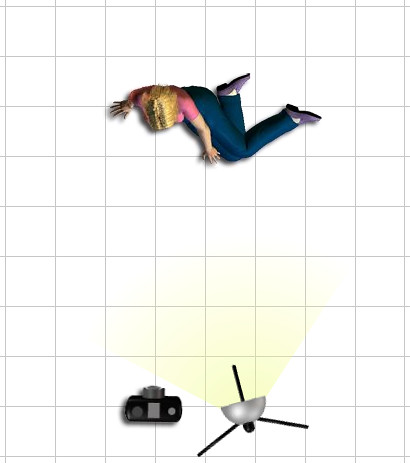
Here's the setup as seen from above, thanks to www.sdgphoto.com/lightingstudio:

BrideGSLSetup

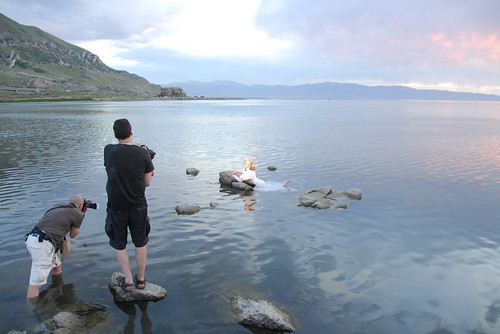
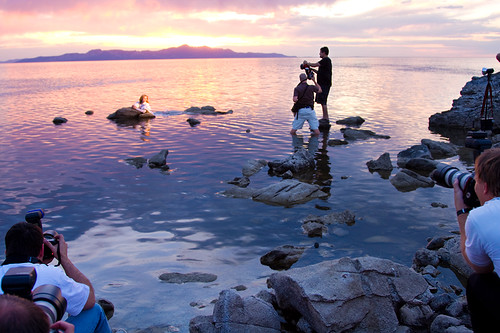
Thankfully some of the other photographers at this event thought to take some photos of Rich, Heidi and me at work, here's a behind-the-scenes from Ryan [Dr Claw's keeper] - thanks!


And here's another angle from Jeremy [JeremyHall].


Finally, to give you an idea of what the scene looked like with the white balance set to daylight, here's another pose I took just prior to my blue photo above:

Bride at The Great Salt Lake

Monday, February 23, 2009

How I Lit It: Runaway bride


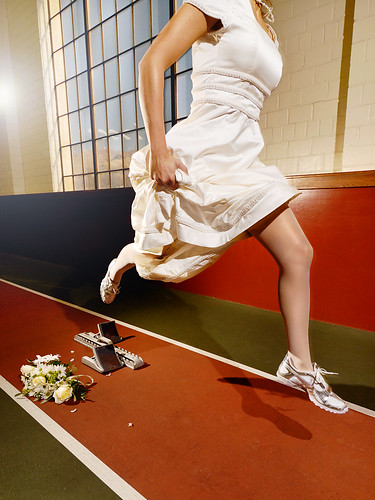
Runaway bride, originally uploaded by calanan.


Einer Nielson Field House
University of Utah
Salt Lake City, UT

Nikon D200, 1/160s @ f/6.3, ISO 400
Tokina 12-24mm f/4 @ 15mm
Nikon SB-600, camera left at edge of frame
Nikon SB-800, behind and above camera

I recently participated in a local photowalking group's seminar on studio lighting in which I joined other photographers in donating the use of our lighting setups so that other photographers could try new/different lighting styles. I'll write more about this separately but in short there were studio lighting setups in a range of styles from full studio strobes to my Strobist-style use of Nikon Speedlights. Models volunteered their time and about 120 photographers were able to experiment with different lighting and posing techniques using their own cameras.

During the event I didn't have much time to develop long conversations with photographers about using different Strobist techniques and it struck me that I could use my blog to describe how I lit a particular photo and open up the comments to discussion.

I'm kicking off this series with one of my favorite shots, an editorial photo I recently took for the Utah magazine Wasatch Woman under the art direction of Raymond Morales at Katapult Design.

The image was to run with a story on divorce and Ray wanted a shot of a bride captured mid-air at a running track to accompany the Wasatch Woman story on "False Starts."

To give me an idea of what he wanted, Ray showed me some stock images of woman runners caught mid-air, which we used as a foundation for the setup. Of course, Ray could not find a stock photo of a running/leaping bride, which led to this assignment but the stock photos he found were very helpful in conveying to me the image he wanted to create.

After finding just the right location on the track, Ray added a set of starting blocks and a bouquet (with some loose petals dropped around it) to complete the look of a bridal track event.

At the time I was using my Nikon D200 as my main camera (I now use a Nikon D700) and I chose to use a Tokina 12-24mm f/4 wide-angle lens to pull in as much of the track as I could. I opted to go with a front-back lighting setup that would fully illuminate model Alicia McGregor's front and give a bit of highlight and kick to her trailing side to make her pop from the background.

Lighting was created using a Nikon SB-800 on a stand for front/key lighting and a Nikon SB-600 on another stand for rear/fill. Both Speedlights were triggered with the Nikon D200's pop-up flash using the Nikon Creative Lighting System (CLS).

I also wanted to give the track a sense of place and time so I exposed the shot for the window to pull in the Wasatch foothills then I set the Speedlights into remote mode so that I could transmit their power levels via the Nikon D200 and CLS.

I typically fire my Speedlights in manual power mode vs. using TTL, I find that using manual power settings gives me more control and I don't have to fight Nikon CLS and its automatic TTL exposure when I try to go out of bounds (e.g. intentionally firing a Speedlight brighter than a balanced lighting situation).

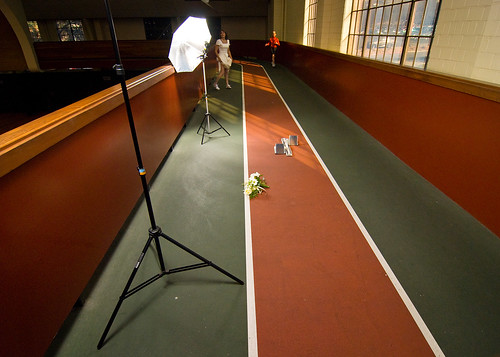
Once Alicia was in costume (that was her real wedding gown) I initially fired the front SB-800 through a white umbrella placed on Alicia's left side of the track, just in front of her. I was bouncing the light from my SB-600 into a silver reflector just behind her on her right side. This created a big soft light but it was missing something, some pop and contrast.

I moved the SB-800 from Alicia's left-front side over to her right (so that both lights were on the same side), which gave a much more pleasing lightscape but something was still missing, the light just looked too soft, too even.

Here's an example of that setup:

Behind-the-scenes for the "Runaway bride" shot

And a shot from above, thanks to www.sdgphoto.com/lightingstudio:

Runaway bride lighting layout

Ray and I went back to the stock photos and then started to brainstorm. He came up with the idea of duplicating the look of bright, harsh daylight and bare camera flashes seen at live sporting events. I removed both umbrellas from the Speedlights, turned them 180 degrees to face Alicia directly and test fired. It was just what Ray was after!

I repositioned the lights to fully illuminate Alicia from the front, to give her a bright highlight from behind and to even catch the edge of my wide-angle lens with a little lens flare and then knelt down just below the SB-800 and angled my camera upwards. Once everything was in place Alicia began the arduous task of running and jumping over the starting blocks while I fired away.

I have to say, Alicia was a real trooper. We shot somewhere between 125-150 frames that day to get just the right moment, which of course meant 125-150 runs and leaps. I heard later that despite being very fit, Alicia was pretty sore the next day. Sorry it took me so long to get that shot, Alicia! :)

Thanks to the model, Alicia McGregor, to Pamela Baumeister, the Editor at Wasatch Woman, to Ray Morales at Katapult Design and to the University at Utah for use of the field house.